.svg)


Applications dans ce flux de travail


Comment ça marche
Améliore la fonctionnalité de ton site web WordPress en intégrant de manière transparente le plugin WP Webhooks à Latenode. Cette intégration offre une solution à un problème courant : le besoin d'une automatisation efficace dans la gestion des données de WordPress et des interactions avec les services externes.
Avant d'intégrer WP Webhooks à Latenode, la gestion des flux de travail automatisés impliquait généralement des processus manuels ou un développement personnalisé. Cela se traduisait souvent par des inefficacités, une charge de travail accrue et des erreurs potentielles.
Grâce à l'intégration de WordPress Webhooks et de Latenode , tu peux désormais automatiser diverses tâches telles que l'envoi de données WordPress à des services externes ou le déclenchement d'actions dans WordPress en fonction d'événements externes. Par exemple, tu peux mettre à jour automatiquement les dossiers des clients dans ton CRM lorsqu'un nouvel utilisateur s'inscrit sur ton site WordPress, ou tu peux déclencher des notifications par e-mail aux utilisateurs lorsque des conditions spécifiques sont remplies.
Cette intégration permet aux propriétaires et aux développeurs de sites Web de rationaliser leurs flux de travail, de réduire les interventions manuelles et d'assurer une communication transparente entre WordPress et les services externes. En simplifiant la gestion du contenu et en permettant des interactions fluides, cette solution améliore l'engagement des utilisateurs et les performances globales du site Web.
Ce qu'il te faut
- Site web WordPress
- Plugin WordPress webhooks
- Latenode compte
Étape 1 : Installation du plugin WP Webhooks
- Télécharge le plugin :

- Visite la page wordpress webhooks et télécharge le plugin sous forme de fichier zip.
Installation :
- Va sur la page de gestion des plugins de ton site WordPress.
- Va sur Mon site > Plugins > Ajouter un nouveau plugin > Télécharger.
- Télécharge le fichier zip téléchargé et installe le plugin.
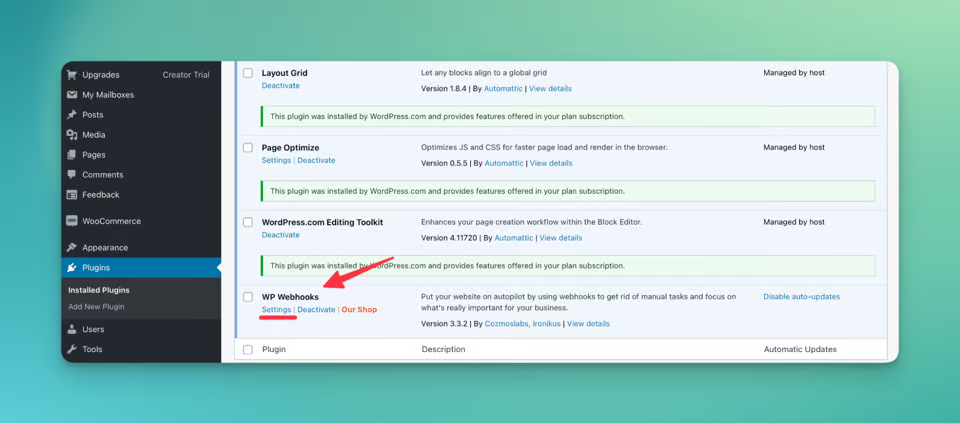
Activation :
- Une fois installé, localise wordpress webhooks dans ton onglet de plugin.
- Clique sur Paramètres pour commencer à configurer le plugin.
Étape 2 : Aperçu des paramètres
Envoyer des données :

- Configure les déclencheurs pour les flux de travail automatisés.
- Sélectionne les événements qui déclencheront l'exécution des tâches d'automatisation.
Données de réception :

- Obtiens l'URL des actions Webhooks avec une clé API.
- Définir les actions à effectuer lors de la réception de données provenant de sources externes.
Étape 3 : Automatiser ton site Web
- Conçois ton scénario :

- Définis le scénario d'automatisation que tu souhaites mettre en œuvre.
- Par exemple, recueillir les commentaires des utilisateurs et les stocker dans Google Sheets.
Mise en place du scénario :
- Crée un nouveau scénario sur Latenode.com
- Renomme ton scénario pour pouvoir l'identifier facilement.
Configuration du déclencheur du crochet Web :
- Ajoute un nœud de déclenchement de webhook à ton scénario.
- Copie le lien webhook généré et configure-le dans le plugin WP Webhooks.
Intégration de Google Sheets :
- Ajoute des nœuds pour interagir avec Google Sheets.
- Configure les nœuds pour ajouter, trouver et mettre à jour les lignes de ta feuille de calcul.

Configuration de l'itérateur :
- Implémente un itérateur pour traiter les données de manière efficace.
- Connecte les nœuds pour itérer dans les données de façon transparente.
Google Sheets : Mise à jour de la cellule x4
À cette étape du flux de travail, nous remplissons les cellules de la feuille de calcul avec le nom, l'adresse électronique et le commentaire de l'utilisateur, tout en mettant à jour le statut de "vide" à "mis à jour". Pour ce faire, quatre nœuds de cellule de mise à jour sont nécessaires.
Ajoute des nœuds de cellules de mise à jour :
- Clique sur "ajouter un nœud" et sélectionne le nœud "Mettre à jour la cellule" dans les options de Google Sheets.
- Assure-toi que ton jeton d'autorisation est inséré et choisis le chemin de la feuille de calcul.
Duplication de nœuds :
- Comme les actions des quatre nœuds sont identiques, tu peux gagner du temps en dupliquant un nœud.
- Clique avec le bouton droit de la souris sur le nœud, sélectionne "copier" et colle-le à l'endroit souhaité.
Renommer un nœud :
- Pour éviter toute confusion, renomme chaque nœud pour les distinguer les uns des autres.
Configuration des cellules et des valeurs :
- Configure chaque nœud pour qu'il mette à jour les cellules respectives avec les valeurs appropriées.
Nom :
- Cellule : A (objet googlesheetnumber de l'Iterator)
- Valeur : objet comment_author du déclencheur webhook
Courriel :
- Cellule : B (objet googlesheetnumber de l'Iterator)
- Valeur : objet comment_author_email du déclencheur webhook.
Commentaire :
- Cellule : C (objet googlesheetnumber de l'Iterator)
- Valeur : objet comment_content du déclencheur webhook.
Statut :
- Cellule : D (objet googlesheetnumber de l'Iterator)
- Valeur : mise à jour
Connecter les nœuds :
- Relie les quatre nœuds au point supérieur de l'itérateur pour une exécution séquentielle.
Sauvegarde les changements :
- Une fois configuré, veille à enregistrer les modifications apportées aux nœuds.
Configure une requête HTTP vers les webhooks de WP Configuration: :
La dernière étape de notre flux de travail consiste à ajouter un nœud de demande HTTP pour gérer des actions telles que la suppression de commentaires. Voici comment le configurer :
Ajout d'un nœud de requête HTTP :
- Ajoute un nœud au point de connexion droit de l'itérateur.
- Cherche "requête HTTP" dans la liste des applications.
Configuration de la requête HTTP :
- Obtiens l'URL de l'action Webhook à partir de l'onglet Recevoir des données du plugin wordpress webhook.
- Accède aux actions webhook wordpress et localise l'action "Supprimer le commentaire".
- Modifie l'URL en ajoutant "&action=delete_comment" et "&comment_id={objet_comment_id}" pour effectuer l'action de suppression.

Méthode de réglage et sauvegarde des modifications :
- Dans le nœud de la requête HTTP, définis la méthode comme GET.
- Sauvegarde les changements pour appliquer la configuration.
Mise en place du filtre :
- Pour éviter la suppression de chaque commentaire, il faut mettre en place un filtre.
- Clique sur la connexion entre l'itérateur et la requête HTTP, puis sélectionne "set up filter".
Configuration du filtre :
- Insère un nom pour le filtre dans le champ "Étiquette".
- Dans le champ "condition", utilise la fonction "contient" de la fenêtre Opérateurs.
- Après le premier écart, insère l'objet comment_id du déclencheur webhooks wordpress.
- Après le point-virgule, insère "https://" pour que seuls les commentaires contenant des liens soient supprimés.
Test et conclusion
- Teste le flux de travail automatisé en déclenchant des événements pertinents sur ton site WordPress.
- Dans le cas du commentaire sans lien, le nœud HTTP n'a pas été activé, regarde :.

- Et celui avec le commentaire :

En suivant ces étapes, tu peux créer un puissant système d'automatisation pour ton site web WordPress en utilisant le plugin WP Webhooks pro et Latenode. Rationalise tes flux de travail, améliore l'engagement des utilisateurs et simplifie la gestion du contenu en toute simplicité grâce à l'intégration transparente de webhooks WordPress.
Pour obtenir un modèle prêt à l'emploi de ce scénario, tu peux y accéder ici. En outre, n'hésite pas à rejoindre notre communauté DiscordLatenode pour obtenir de l'aide supplémentaire et discuter des stratégies d'automatisation.
Bonne automatisation !
Catégories
AI
Informatique et développement


